How to Dehydrate Fruit, Vegetables and Herbs
The oldest way to keep a glut, made simple. Use the interactive "what can I dehydrate" reference below for prep, temperature and time on any food.
Drying is the oldest and simplest way to preserve food. Long before fridges and freezers, people kept the harvest by removing the water that mold, yeast and bacteria need to grow. It is also the most energy-light method you can use, especially for herbs that need barely any heat at all. When a tree drops more fruit than you can eat, or the pepper plants go wild in the warm season, drying turns a glut into something you can store for months.
This guide walks through the three ways to dry food, how to prepare each type, the temperatures and times that work, and how to store the result so it keeps. For tested guidance and recommended pre-treatment, lean on USDA and the National Center for Home Food Preservation (NCHFP). The interactive reference picker below gives you the prep, temperature, rough time and a done-when test for around twenty common foods.
What Can I Dehydrate?
Pick a food to see how to prepare it, what temperature to dry it at, roughly how long it takes, an oven note and how to tell when it is done.
Times are guidance only. They vary with your appliance, the humidity and the size of the pieces, so check the food for dryness rather than watching the clock.
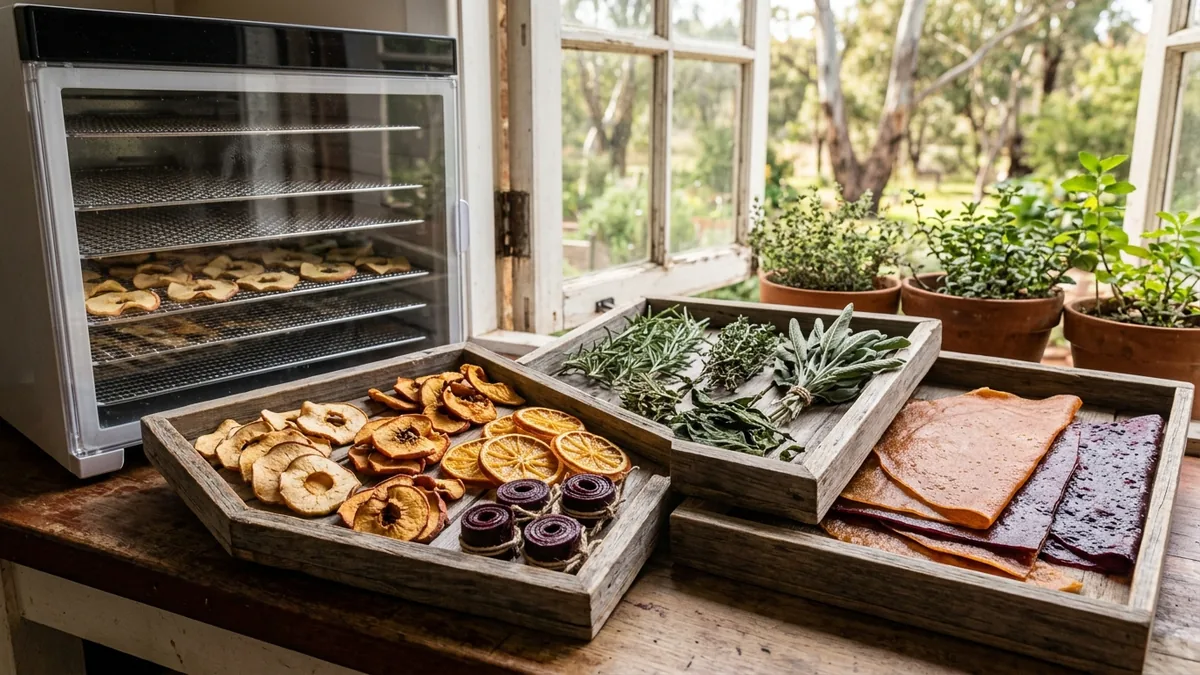
Three Ways to Dry: Dehydrator, Oven, Air
Electric dehydrator
A dedicated dehydrator gives the best control. It holds a low, steady temperature and moves air evenly across every tray, so food dries at the same rate top to bottom. You set the temperature, walk away, and come back when it is done. For anyone who dries food more than a couple of times a year, it is the easiest and most reliable option. Models with an adjustable thermostat are worth the extra cost because herbs, vegetables and fruit each want a different heat.
Oven
An oven works for the occasional batch. Set it to its lowest temperature and prop the door ajar with a wooden spoon so the moisture can escape rather than steaming the food. Spread pieces in a single layer on racks and check often, turning trays so they dry evenly. The downsides are that most ovens do not go low enough for delicate herbs, they use a lot more energy, and they tie up the oven for hours. Good for a tray of tomatoes or apples now and then.
Air-drying
Air-drying is perfect for herbs and thin peppers and costs nothing. Tie small bunches with string and hang them somewhere warm, dry and airy out of direct sun, which would bleach the color and flavor. A paper bag with a few holes punched in it, slipped over the bunch, keeps off dust and catches any leaves that drop. It is slower and depends on the weather, so it is not the method for juicy fruit or vegetables, but for a handful of basil or a string of cayennes it is hard to beat.
Pre-Treatment: Blanching and Stopping Browning
A little preparation before drying improves color, flavor and storage life. What you need to do depends on the food, and USDA and NCHFP publish tested pre-treatment steps worth following.
Blanching vegetables
Blanching means briefly boiling or steaming a vegetable, then draining it. It sets the color, slows the enzymes that cause off flavors during storage, and shortens drying time. Carrots, green beans, peas and sweet corn all dry better after a short blanch. Many other vegetables, such as onions, mushrooms, peppers and tomatoes, do not need it. The picker above notes which foods to blanch and for roughly how long.
Stopping fruit browning
Light-colored fruit such as apple, pear and banana goes brown when the cut surface meets the air. A quick dip in lemon water, or a solution of ascorbic acid, slows that browning and keeps the slices looking fresh. Dip the slices, drain them, then load the trays.
Cracking waxy skins
Some whole fruit with a waxy skin, such as grapes and blueberries, dries very slowly because the skin holds the moisture in. A short steam blanch, sometimes called checking, cracks the skin so the water can escape and the fruit dries in a reasonable time. Halving the fruit does the same job by hand.
How to Tell When It Is Done, and Conditioning
The done test depends on the food. Dried fruit should be leathery and pliable, with no beads of moisture when you squeeze a piece. Vegetables should be brittle or hard and snap rather than bend. Herbs should crumble between your fingers. Because the right point varies so much with the appliance and the weather, always judge the food itself rather than the timer.
Conditioning dried fruit
Conditioning is the step most people skip, and it matters. After drying fruit, let it cool, then pack it loosely into a clean jar, seal it and shake it daily for 7 to 10 days. This evens out the residual moisture so no piece is wetter than the rest. If you see condensation form on the inside of the glass, the fruit is not dry enough, so return it to the dehydrator and dry it further. Conditioning is a simple habit that helps prevent mold once the jar goes into the cupboard.
Storage and Shelf Life
Let dried food cool completely before you pack it, since warm food creates condensation in the jar. Store it in airtight jars or vacuum bags, away from light and heat, and label and date every container. Properly dried and stored fruit and vegetables typically keep 6 to 12 months, while herbs are best used within a year while the flavor is strong. Check jars now and then for any sign of moisture or mold, and discard anything that smells off. A few oxygen absorbers in the jar, or keeping the jars in the freezer, extends the life further.
| Food type | Rough shelf life | Notes |
|---|---|---|
| Dried fruit | 6 to 12 months | Condition first, then store airtight away from light |
| Dried vegetables | 6 to 12 months | Low-acid, so keep fully dry and airtight |
| Dried herbs | Within 1 year | Flavor fades over time, so use while fresh tasting |
| Fruit leather | Up to a few months | Roll in parchment paper, store airtight or refrigerate |
Rehydrating and Using Dried Food
Most dried vegetables come back to life with a soak in hot water for 20 to 30 minutes, or you can add them straight to soups, stews and casseroles where they rehydrate as they cook. Dried fruit is good eaten as it is, or soaked to plump it up for baking. Some of the best uses do not need rehydrating at all. Blitz dried vegetables, mushrooms or tomatoes into a fine powder for instant flavor boosters and homemade stock bases. Crush dried herbs between your fingers as you add them to a dish, since they release the most flavor when broken up fresh.
Fruit Leather (Fruit Roll-Ups)
Fruit leather is a great way to use soft or slightly bruised fruit. Puree ripe fruit until smooth, tasting as you go and adding a little sweetener or a squeeze of lemon juice if it needs it. Spread the puree about 1/8 inch thick on a lined tray or a purpose-made leather sheet, keeping it even so it dries at the same rate. Dry at about 140 F (60 C) for 6 to 12 hours until it is tacky but no longer sticky and peels away cleanly from the sheet. Let it cool, then cut it into strips and roll them in parchment paper for storage.
Drying Temperatures at a Glance
| Food type | Temperature | Notes |
|---|---|---|
| Herbs | 95 F (35 C) | Lowest heat protects the volatile oils and color |
| Vegetables | 125 to 130 F (52 to 55 C) | Blanch most types first |
| Fruit | 135 to 140 F (57 to 60 C) | Dip light fruit in lemon water to stop browning |
| Fruit leather | 140 F (60 C) | Spread about 1/8 inch thick on a lined sheet |
| Tomatoes | 135 F (57 C) | Store fully dry, or in oil only if refrigerated |
When to Dehydrate
The simplest rule is to dry the gluts as they come. In Florida, herbs grow and can be cut for much of the year, so the dehydrator rarely sits idle. Tomatoes and peppers come in heavily during the warm-season flush, which is the time to put trays away. Citrus ripens through winter and gives you dried peel for cooking and tea. One thing to keep in mind is that Florida humidity makes air-drying unreliable for anything but herbs, so reach for a dehydrator or the oven for fruit, tomatoes and vegetables.
Turn Your Glut into a Full Pantry
Log your harvests in the Planting Season app, see when each crop is about to peak, and plan your preserving so nothing goes to waste.
Open the App →Plan Your Harvest in the App
Drying works best when you catch a crop at its peak rather than scrambling after a glut. The Planting Season app lets you log what you pick, track which beds are producing, and plan ahead so you know a wave of tomatoes or peppers is coming and can have the dehydrator ready. It ties your growing and your preserving together in one place.
Frequently Asked Questions
Do I need a dehydrator or can I use the oven?
You can dry food in an oven. A dedicated dehydrator gives better, more even results because it holds low temperatures and moves air gently across every tray, which an oven struggles to do. To use an oven, set it to its lowest temperature, prop the door ajar with a wooden spoon to let moisture escape, and watch it closely. A dehydrator is worth it if you dry often, but the oven is fine for the occasional batch.
Do I have to blanch vegetables before drying?
Most vegetables dry better and keep longer if you blanch them first. A short boil or steam sets the color, slows the enzymes that cause off flavors, and shortens drying time. Carrots, green beans, peas and sweet corn benefit most. Leafy greens, onions, mushrooms, peppers and tomatoes do not need blanching. For tested guidance and recommended pre-treatment, follow USDA or the National Center for Home Food Preservation (NCHFP).
How do I know when food is properly dried?
It depends on the food. Dried fruit should be leathery and pliable with no beads of moisture when you squeeze it. Vegetables should be brittle or hard and snap rather than bend. Herbs should crumble between your fingers. Drying times are guidance only because they vary with your appliance, the humidity and the size of the pieces, so check the food, not the clock.
What is conditioning and why does it matter?
Conditioning evens out the residual moisture left in dried fruit so no piece is wetter than the rest. After drying, let the fruit cool, pack it loosely into a clean jar, seal it and shake it daily for 7 to 10 days. If you see condensation on the glass, the fruit is not dry enough, so return it to the dehydrator. Conditioning is a simple step that helps prevent mold in storage.
How long does dehydrated food last?
Properly dried and airtight food keeps well. Dried fruit and vegetables typically last 6 to 12 months, and herbs are best used within a year while the flavor is strong. Store in airtight jars or vacuum bags, away from light and heat, and label and date every jar. Oxygen absorbers or freezer storage extend the life further. Check jars now and then for any sign of moisture or mold.
Can I dry herbs without a dehydrator?
Yes. Herbs are the easiest food to air dry. Tie small bunches with string and hang them somewhere warm, dry and airy out of direct sun. A paper bag with a few holes punched in it, slipped over the bunch, keeps off dust and catches any leaves that fall. They are ready when the leaves crumble. A dehydrator on its lowest setting of about 95 F (35 C) does the same job faster. In humid areas air-drying anything but herbs is unreliable, so use a dehydrator or oven.
How do I make fruit leather?
Puree ripe fruit until smooth, sweetening or adding a little lemon juice if needed. Spread it about 1/8 inch thick on a lined tray or a leather sheet and dry at about 140 F (60 C) for 6 to 12 hours until it is tacky but no longer sticky and peels away cleanly. Cool it, then cut and roll it in parchment paper for storage.
See also our preserving hub for every way to keep a harvest, from freezing to fermenting.